
Yoga is a mild and restorative approach to wrap up your day. Oh National survey More than 55% of people that practiced yoga found that it helped them sleep higher. More than 85 percent said yoga helped reduce stress. You can use supportive props like bolsters, blankets, and blocks to make the pose comfortable so you'll be able to stay within the pose longer and proceed to breathe.
Your breath is the important thing to having the ability to chill out in these poses. Breathing in yoga is just as essential – if no more essential – because the physical poses. Use a mild and calming yoga respiratory technique called Ujjayi Breath, also often called Ocean Breath or Victorious Breath. Breathe in deeply through the nose. With your mouth closed, exhale through your nose as you tighten the back of your throat as for those who were saying “ha” but keep your mouth closed. This breath should sound like ocean waves (or like Darth Vader from Star Wars). Use this slow and regular respiratory to ease yourself into each of those poses.
Practice these yoga poses before bed and stay in each for 3 to 5 minutes. Use your sea breath in every pose, aside from corpse pose, where your respiratory returns to normal.
These seven restorative yogas relieve stress and tension at the top of the day. The more often you practice these poses, the more likely you might be to get a superb night's rest.
1. Wide Knee Child's Pose (Balasana)

Photo: © THANATASDcom/Getty Images
This relaxing pose provides a way of calm and stability. Be careful if you've got hip or knee injuries.
- Kneel on the ground and convey your big toes together.
- Place your knees hip-width apart or the identical width as the perimeters of the mat.
- Exhale and sink your torso into your thighs.
- Let your hands rest along your torso, in order that your arms are facing the back of the room, palms facing up. This should relieve shoulder tension by pulling your shoulder blades away from one another.
- If you would like a more lively pose, extend your arms forward, palms down on the mat.
- Keep your brow on the bottom. Gently rotate your head in all directions. It releases tension in your brow.
- Take slow, regular breaths out and in through your nose.
2. to bend forward (Atanasana)


Photos: © fizkes/Getty Images
- Stand along with your feet hip-width apart. Take a deep breath.
- Exhale to elongate your spine and extend your torso forward and over your legs.
- Hold your elbows or rest your hands in your shins or the ground.
- Don't strain to achieve the ground – the goal isn't to attain an ideal form, but to elongate the spine and chill out your neck and shoulders.
- This forward bend means that you can chill out the strain in your neck and gently stretch your hamstrings, calves and hips. Be careful if you've got a back injury.
- If it's hard to your hands to achieve the ground or your back hurts, place blocks under each hand to supply more support.
- Breathe out and in slowly and simply through your nose.
- If you've got tight hamstrings, keep your knees “soft” by bending them barely in order that your chest can rest in your thighs.
- Nod your head “yes” and “no” to chill out and loosen your neck muscles.
- To come up, roll slowly to standing to avoid lightheadedness.
3. Standing Half Forward Bend (Ardha Atnasana) on the wall

Photo: © fizkes/Getty Images
This is one other modification of the pose, standing forward bend. Video is on the market. Here.
- Place your mat against the wall.
- Stand a few foot away from a wall.
- Your feet needs to be hip-width apart and parallel to the perimeters of the mat.
- Press your hands against the wall along with your palms prolonged at hip height.
- Step back along with your feet hip-width apart and lower your torso until you're in a flat-back position, in order that your torso is flat on the ground.
- Use your palms to press the wall away from you to elongate your back.
- Press into all 4 corners of your feet.
- Keep your ears level along with your arms.
- Adjust your distance from the wall to be certain your body is at a 90 degree angle (L shape). If you might be too near the wall, your back and arms won't have the opportunity to totally extend. If you're too removed from the wall, you won't have the opportunity to lean forward enough.
- Continue to breathe deeply while pressing the wall away from you along with your palms.
4. Tilt binding angle (supta baddha konasana)

Photo: © fizkes/Getty Images
This pose reduces tension in your hips and groin area. Be careful if you've got knee, hip or back injuries.
- Lie down on the mat.
- Bend your knees, and place your feet on the ground, near your tailbone.
- Bring the soles of your feet together and let your knees move away from one another, while placing blocks or firm cushions under your knees on both sides to support your hips.
- If your hips are tight, you'll be able to adjust your feet in order that they're further away out of your tailbone or put more blocks or cushions under your knees for extra height.
- Rest your arms on the ground about 45 degrees away out of your torso, palms facing the ceiling.
- Do not press on the knees to create additional stress. Gravity is already at work.
- You should feel a slight stretch in your hips and back, but it surely shouldn't be painful.
5. Legs of the Wall Pose (Evaporate)
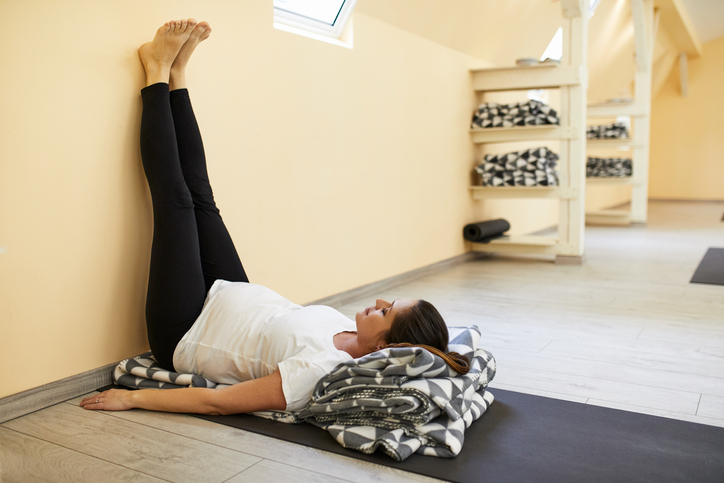
Photo: © Dangobic/Getty Images
At the top of the day, especially in case your job involves being in your feet, your feet and ankles can turn into swollen and drained. This easy pose helps to re-circulate your blood flow.
- Find an empty space in your wall and place your mat against the wall.
- Sit on the mat and convey your left or right side near the wall in order that your side body meets the wall.
- Lie back on the mat, and gently place your feet up the wall.
- Relax your arms at your sides.
optional: You can add a rolled mat or firm cushion under your tailbone to provide your tailbone extra support.
6. Corpse Pose (Svasana)
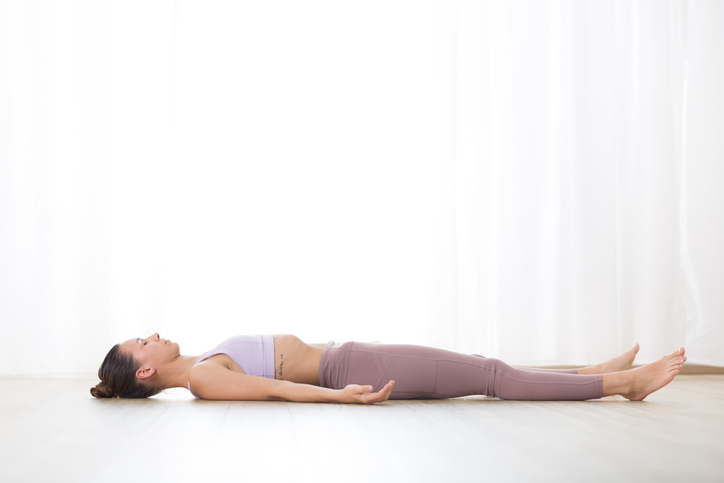
Photo: © katsu80/Getty Images
Corpse pose is the normal final resting pose of yoga practice. You can allow your respiratory to return to normal on this pose.
- Lie back on the mat.
- Hug your knees tightly towards your chest and take a deep breath.
- Exhale while keeping your tailbone on the mat and your legs away from you.
- Your feet needs to be hip-width apart and comfortably apart, toward the perimeters of the mat.
- Let your lower back soften and chill out. You mustn't feel any pain or tightness in your lower back.
- Rest your arms at your sides, palms facing up.
- Check to be certain your shoulders aren't hunched, and in that case, keep your shoulders away out of your ears.
- Optional: Place a folded towel over your eyes to dam any light.
7. Legs on a chair pose
This pose is beneficial for individuals who could have more difficulty extending their legs fully up the wall as a result of lower back, knee or hip injuries. You can discover a video on easy methods to get into this pose. Here.
- Place a chair at the top of your yoga mat in order that it faces you.
- Place a folded towel or blanket on the seat of the chair. Depending on the peak of the chair, you could also need a couple of folded blankets under your sacrum.
- Sit near the mat, keeping your seat near the front of the chair.
- Lie in your side within the fetal position along with your knees bent. Squat to the middle of the mat.
- Roll onto your back with bent knees so your calves can rest on the seat of the chair.
- Your thighs needs to be at a 90-degree angle to your calves.
- Keep your arms relaxed at your sides, palms facing up.